Month: December 2022

Sauces and Bastes

Quick and Easy Pizza Sauce Recipe

This is such an easy recipe. It makes cooking from scratch a joy.

I make pizza a lot, and when I say a lot, I mean there is almost always a ball of dough fermenting in the refrigerator.

So, when I am in the mood to make a pizza, or pizza poppers or calzones, or whatever pizza-like creature I’ve been thinking about, it’s nice to have an easy sauce recipe I can rely on.

It’s also great for dipping.

No-Cook Pizza Sauce Made with Crushed Tomatoes

Recipe by Sheri Tomato

Ingredients

  • 1 28 oz can San Marzano Crushed Tomatoes

  • 1 tsp sugar

  • 1/2 tsp salt

  • 1 tsp oregano

  • 1 tsp basil

  • 1 tsp garlic powder

  • 1/2 tsp crushed red pepper (optional)

  • 1 TB red wine vinegar

Directions

  • Mix all ingredients together. That's it, you're done. It is ready to go.

Notes

  • If you are not using your sauce right away, it will keep for up to one week in the refrigerator. Make sure to store it in an airtight container.
  • If you are going to freeze it, store it in an airtight freezer container or freezer storage bag. It can be stored in the freezer for up to 3 months.
  • When using your sauce, it does not need to be cooked. Just thaw it out and bring it to room temperature.
 
Appetizers

The Game-time Appetizer Sure To Please Everyone

These tasty treats are so easy to make. I always keep a batch in the freezer. You just pull them out and toss them in the air fryer. 

I get so many compliments from people when I bring these guys to the party.

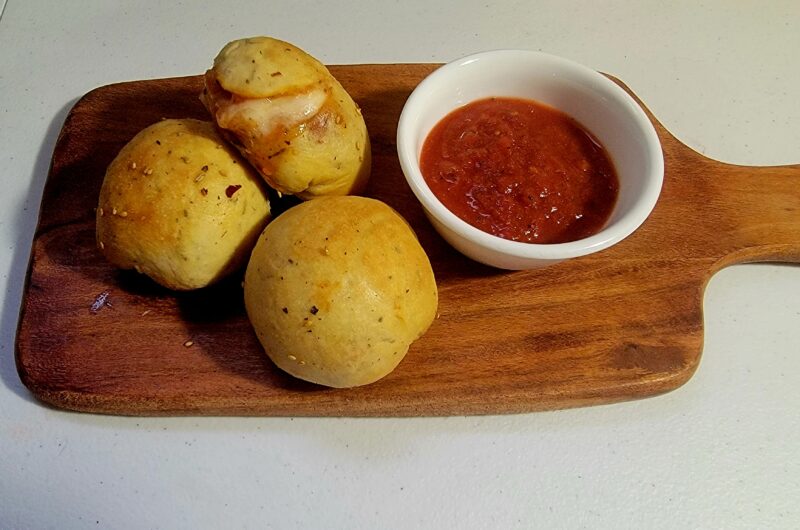
Cheesy Pleasy Pizza Popper Pleasers

Recipe by Sheri Tomato

These guys go fast, so make sure to make an extra batch. If stored properly they are good for up to 5 days in the fridge and up to 3 months in the freezer.

You can use store bought pizza dough, but I recommend you use My go-to Pizza Dough Recipe. Its soft, airy texture is perfect for this recipe.

Ingredients

Directions

  • If pizza dough is refrigerated, bring to room temperature in covered container (1 - 2 hours).
  • If cooking in oven, preheat to 450 degrees Fahrenheit. For air fryer - preheat to 400 degrees Fahrenheit.
  • On lightly floured surface, divide dough into 12 2.5 oz balls. Flatten into squares, leaving space between each square. Cover with clean kitchen towel and let dough rest in warm place for 15 minutes.
  • Roll out each square a little more, without tearing the dough. Cover and let rest another 10 minutes.
  • Roll out each square one more time to approximately 5x5 inches each. Cover one last time and let rest 10 more minutes.
  • Working one square at a time (keeping the other ones covered), Place 1 TB mozzarella cheese in middle of square. Place 1 pepperoni slice on top of cheese. Spoon 1 TB of sauce on top of pepperoni. Place another pepperoni on top of sauce. Put 1 more TB mozzarella cheese on top of 2nd pepperoni.
  • Gently pull up corners of dough, one at a time to cover ingredients. Seal dough and gently pack it into a ball with your hands, like you would a snowball. Then gently roll the sealed ends around on the lightly floured surface to smooth it out. Place the balls, seal side down on a lightly oiled, aluminum foil covered baking sheet. Repeat for the rest of the balls, being sure to leave space between each ball.
  • Brush each ball with olive oil. Then sprinkle sesame seeds on top (optional). For oven, place baking sheet in oven and cook till a light golden brown (about 20 minutes) For air fryer, cook in batches, being sure to keep a little space around each ball, cooking till golden colored (about 8 - 10 minutes).
  • Let cool a few minutes and serve with pizza sauce or ranch dressing for dipping.
 
wok burger
Meat, Uncategorized

Best of Both Worlds – Juicy Burgers with a Healthy Salad

There is nothing I love more than a juicy delicious hamburger. Yes, I know it’s not the healthiest of meals. That’s why I pile salad ingredients between the buns. 

I also add a teaspoon of turmeric into the ground beef, along with the other spices.

According to the Cleveland Clinic and many other sources, the spice turmeric can act as an antioxidant and has been credited with all kinds of other benefits including pain relief, improving memory, an antidepressent, antiinflamatory agent and also has been credited with lowering the risk of heart disease.

What more could you ask for in a burger?  Enjoy!

Wok Burger with Loaded Salad Toppings

Recipe by Sheri Tomato

Have the best of both worlds with this delicious burger cooking in it's juices at the center of the wok, then put it on a toasted bun with wonderful, healthy salad ingredients on the top and bottom. Yum.

Ingredients

  • 1 lb ground beef

  • 2 TB water

  • 1/4 tsp baking soda

  • salt and pepper, to taste

  • 1 tsp chipotle seasoning

  • 1 tsp turmeric

  • 3 each hamburger buns, buttered and toasted (in wok or air fryer

  • Salad Toppings
  • 1 cup Lettuce, cut into thin strips

  • 1 each English cucumber, sliced thin, with skin on

  • multicolored sweet peppers, deseeded and cut into thin rings

  • Ranch dressing

Directions

  • Break up ground beef in large mixing bowl.
  • In small bowl or cup, whisk together water and baking soda.
  • Mix water/baking soda combo into ground beef. Let sit 15 minutes in refrigerator.
  • Form into 3 burger balls.
  • Heat wok on medium high heat.
  • Place a ball in middle of wok. Flatten with heavy spatula.
  • Season with salt, pepper and chili seasoning. Let cook for 2 minutes or until bottom starts to brown.
  • Flip. Season other side. Let cook for 1-2 more minutes, until temperature reads 165 degrees Fahrenheit.
  • Remove from pan and repeat steps 6 -8 for other two burgers. Cover cooked burgers with aluminum foil to retain heat until all burgers are cooked.
  • Toast buttered hamburger bun in wok or air fryer until lightly browned.
  • Add lettuce and onions to bottom of bun. Place burger over lettuce. Top with peppers, cucumbers, ranch dressing, and of course, top of bun.
 
Appetizers, Eggs & vegetables, Vegetables

Cook up a plate of old school corn fritters

Mom's Corn Fritters

Recipe by Sheri Tomato
Prep time

5

minutes
Cooking time

4

minutes
Total time

0

minutes

This was one of my favorite side dishes growing. My mom would mix up a big batch. We would eat them as fast as she could make them. Simple delicious way to eat your veggies.

Ingredients

  • 1 egg

  • 1 14 oz can Creamed corn

  • 1/3 cup all purpose flour

  • 1 tsp baking powder

  • 1/2 tsp salt

  • 1/2 tsp black pepper

  • Oil for frying

  • Butter for serving

Directions

  • In medium sized bowl, whisk egg. Mix in the creamed corn.
  • In separate bowl combine flour, baking powder, salt and pepper.
  • Slowly add flour mixture to egg and corn while stirring with whisk. Mix well until all ingredients are thoroughly combined.
  • Heat frying pan, medium high and add 1 Tbs of oil. Swirl pan to coat it.
  • Working in batches, drop the batter into the hot pan, forming circles. Be sure to leave space between each fritter.
  • Cook for 2 minutes or until top of batter starts to bubble. Flip and cook other side for another minute. If fristters start to burn, lower heat to medium.
  • Fritters are done when both sides are golden brown.
  • Place cooked fritters on cooling rack while cooking the rest of the fritters. This will prevent your corn fritters from getting soggy.
  • Serve hot with a pat of butter atop each corn fritter.

Notes

  • You can store corn fritters in the refrigerator for 3 - 5 days or freeze them in a sealed freezer container for up to 3 months.