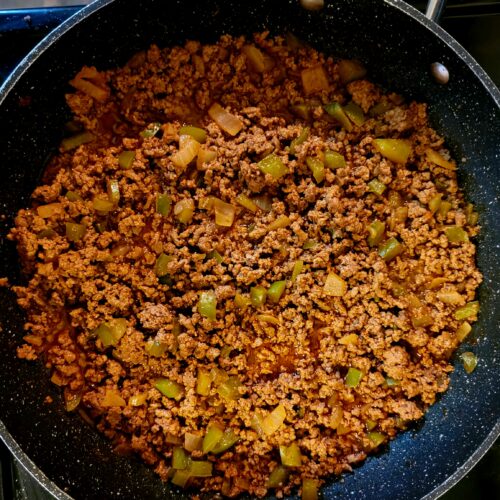
Made from Scratch Taco Meat
Do you have a packet of taco seasoning in your pantry? Did you ever read the back of a taco seasoning mix that you buy in the store? Dextrose, hydrolyzed vegetable protein, Caramel color, disodium inosinate. Doesn't sound very yummy to me. Throw out the store-bought taco mix. Let's dice some onion and green peppers instead and get the rest of the flavor from your spice rack.
Equipment
- heavy skillet
- wooden spoon or heavy spatula
Ingredients
- 2 TBS olive oil
- 1/2 cup diced green bell pepper
- 1/2 cup diced spanish onion or other yellow onion
- 1 lb ground beef (80/20 is good for this recipe)
- 2 tsp chili powder
- 1 tsp paprika
- 1/2 tsp salt
- 3/4 tsp cumin
- 1/2 tsp garlic powder
- 1 cup water
- 2 tsp tomato paste I buy my tomato paste in the tube instead of a can. Much easier when you only need a small amount
Instructions
- Heat olive oil in a heavy skillet on medium high
- Add diced onions and green pepper. Sauté on medium high, stirring for about 3 minutes.
- Add ground beef. Break up ground beef in the skillet with a wooden spoon or heavy spatula until you have very small chunks of meat.
- Keep cooking and stirring the ground beef until it is no longer pink anywhere.
- Turn off the heat and drain the grease.
- Put heat back up to medium and stir in the spices
- Whisk water and tomato paste together in a cup and pour over meat mixture.
- Stir the meat till the liquid starts to boil
- Turn heat down to medium low and cook till most of the liquid is gone, stirring occasionally. This should take about 20 minutes.
- Remove from heat.
- There are many uses for taco meat. My favorite ways to use it is in a taco shell with your favorite toppings or over a baked potato with some sour cream, or as a base for taco salad. See my appetizer section for more ideas.
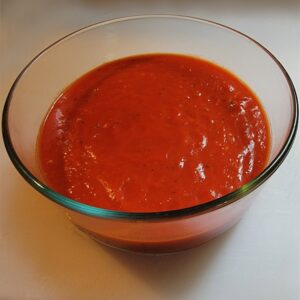
Sheri Marinari Sauce
I use Marinara sauce in a lot of my recipes, or served on the side with my appetizers. This is my Sheri Marinari Sauce. I hope you like it.
Equipment
- Handheld emulsifier or blender
- sauce pan
Ingredients
- 1 28 oz can whole peeled San Marzano tomatoes
- 1/2 cup water
- 2 TBS sun dried tomato paste
- 3 TBS extra virgin olive oil
- 10 cloves garlic, diced very fine
- 1 tsp salt
- 1/4 tsp oregano
- 1/4 tsp basil
- 1/4 tsp crushed red peppers
- 3 bay leaves
Instructions
- Pour can of tomatoes into large bowl. Add 1/2 cup water to can. Mix remnants of tomatoes from can with the water and add to the bowl.
- Using emulsifier or blender, crush tomatoes until most of chunks are gone and mix is fairly smooth.
- Add olive oil to your saucepan and heat on medium for 1 minute.
- Add garlic and bay leaves to the pan. Sauté for about 2 minutes.
- Add your bowl of pureed tomatoes into the saucepan.
- Stir occasionally until sauce starts to bubble.
- Reduce heat to simmer and add the rest of your ingredients.
- Let simmer for about 15 minutes, stirring occasionally.
- Remove from heat and pluck out the bay leaves. Discard bay leaves
- At this point, the sauce can be used immediately in whatever dish you need it for or stored for later use. It can be stored in refrigerator in sealed container or baggy for up to seven days. It can be kept in freezer, in freezer safe container for up to 3 months.

Seasoned Two Day Pizza Dough Recipe
I have been on a quest to make the perfect pizza dough for the past 50 years. It started in my early teens with my brother. At the time (early 1970's) the only choice for making your own pizza at home was a boxed Chef Boyardee pizza kit. It was pretty bad. But we added things and made it our own, the best we could.How things have changed. There are so many methods and options for quality pizza making. I have read a lot of books and tried a lot of pizza recipes since the 1970's. And don't get me started on all of the different flours out there. My pizza dough recipe is constantly evolving, but for now this pizza moment in time, this is go-to recipe when making pizza dough.
Equipment
- Kitchen Aid Mixer
- 2 Seal tight containers to store pizza dough in refrigerator.
Ingredients
- 2 tsp active dry yeast
- 3/4 cup hot water
- 2 TB extra virgin olive oil
The dry Ingredients
- 1 1/2 cup "00" pizza flour I used to have to order it online from King Arther Baking Company,, but more and more grocery stores are now carrying it.
- 1/2 cup bread flour
- 1 1/2 tsp sugar
- 1 tsp salt
- 1 tsp garlic powder
- 1 tsp basil
Instructions
Making the Dough
- Combine yeast, hot water and oil in the bowl of your kitchen aid mixer.
- Let the wet yeast mix stand 5-10 minutes to proof. If bubbles form, the yeast is good. Proceed to next step. If bubble don't form, the yeast is no good. Discard your wet mix and start over with fresh yeast.
- While you are waiting for your yeast to proof, you can mix all of the dry ingredients (flours, sugar, salt, garlic powder and basil) together in a separate bowl.
- Now you are ready to incorporate your flour mix into your wet mix. Attach the dough hook to your kitchen aide mixer.
- Slowly add your flour mix to the kitchen aide bowl, mixing on low to medium speeds, 1/2 cup of flour mix at a time.
- Eventually, as you continue to add and mix the flour into the wet ingredients, the dough will begin pulling away from the sides. Continue kneading with the mixer for another 2 minutes.
- Then remove the dough from the mixer with a rubber spatula, letting it spill onto a lightly floured board. The dough will be sticky.
- Using floured hands, begin to knead the dough until a soft dough ball has formed. About 3-5 minutes. Add more flour to your board if needed, but please don't overdo it.
- Place the dough in a lightly oiled container and seal it with a lid. Let sit at room temperature for 1 hour.
- After the hour is up, split the dough in half. Shape the halves into 2 separate dough balls.
- Place the dough balls in 2 separate lightly oiled containers. Seal with lid and place in the refrigerator for 1 to 2 days. This is where the dough develops all of the flavor.
- After 1 -2 days of refrigeration, the dough is ready to go.
- Take the dough container out of the refrigerator and let it sit on the counter to bring it to room temperature (about 2 hours)
- Place the dough ball on a lightly floured surface and gently stretch it to the shape you want. If the dough pulls back while you are stretching it. Let it rest another 5-10 minutes under a clean hand towel. This will relax the dough. You should now be able to stretch it out.
Notes
There you have it, a ball of pizza dough, ready to be turned into a delicious pizza, calzone or whatever you want to do with it. I will be adding lots of appetizer recipes that use pizza dough. Stay tuned.

Hard Boiled Eggs
When I need hard boiled eggs in a recipe, this is my go-to method. It cooks them perfectly every time.
Ingredients
- 6 eggs
- 1 tsp baking soda
Instructions
- Gently place 6 eggs into a large pot on stove.
- Pour cold water into the pot, being sure that the eggs are covered by at least 1" of water
- Add one tsp of baking soda to the water.
- Heat on medium high until water comes to a rolling boil.
- Turn off burner and cover the pot with tight fitting lid.
- Leave alone for 12 minutes.
- Transfer eggs to a bowl of ice water.
- Let your eggs sit in cold water for 10 minutes.
- Eggs are done. Either use now or store in refrigerator for up to seven days.

Low and Slow Bacon
There are many ways to cook bacon. Because we are in the dog days of summer right now, I don't want to turn on the oven. So we will be cooking it on the stovetop.
Equipment
- nonstick heavy duty frying pan or wok
Ingredients
- 6 slices raw bacon
- 1/8 cup water
Instructions
- 1. Lay your bacon strips side by side in cold pan.2. Pour 1/8 cup of water on top of bacon.3. Turn the stove to med/high. Cook until all water has evaporated. Approximately 5 minutes. This helps to render down the fat.4. Once water has evaporated, turn heat down to med/low.5. Occasionally rearrange bacon, and flip it, to ensure even cooking.6. Once the bacon as reached your happy level of crispiness, approximately 10 - 15 minutes.7. Turn off the heat and let the bacon drain on a paper towel lined plate.
Notes
Once your pan has cooled down a little, pour excess bacon grease into a mason jar and store in fridge. We will be using this in other recipes. Bacon grease is full of flavor. Do not discard it.
I will be posting future recipes on how to cook bacon in the oven and in the air fryer.

Bacon Egg and Cheese Omelet with Peppers and Onions
This is my basic omelet recipe. You will be using this when making some of my appetizer recipes.
Equipment
- non stick frying pan or wok
Ingredients
- 1 TBS bacon grease or canola oil
- 1/2 green bell pepper diced
- 1/2 red bell pepper diced
- 1/2 medium onion diced
- 6 eggs
- 4 strips bacon cooked and chopped roughly
- salt
- pepper
- 2 slices mozarella cheese whole milk
- 2 slices cheddar cheese
Instructions
- 1. Whisk eggs in a bowl for about 2 minutes. Lightly salt. Set aside and let rest at room temperature for about 15 minutes. 2. Dice peppers and onions.3. Heat up oil or bacon grease in pan over medium heat for about 1 minute.2. Throw in half of peppers and onions. Season with salt and pepper.3. Cook, stirring for 2 minutes.4. Give the eggs another whisk and pour over peppers and onions.5. Let cook without disturbing for 1 minute.6. Lift up edges of omelet with a spatula and tilt pan, letting the uncooked egg run underneath the egg that has started to cook. Do this all along the edges until the omelt is set.7. season with more salt and pepper.8. Throw rest of peppers and onions across the egg.9. Cook for two more minutes.10. Turn off stove and layer cheese on top.11. Cover with lid for 1 minutes or till cheese has melted.12. Serve and enjoy (or save for one of my appetizer recipes).
Notes
This makes one huge omelet - good for sharing with your favorite breakfast buddy.

Meatballs with a spicy kick
These made-from-scratch meatballs are a little bit spicy and absolutely delicious. I baked them in the air fryer, but they can also be cooked in the oven. If cooking in the oven, you will need to bump up the temperature to 450 F and cook for about ten minutes longer. Every oven is different, so keep an eye on them. Makes about 20 meatballs.
Equipment
- Air Fryer
Ingredients
- 1 lb ground beef
- 2 large eggs
- 1 TB Worcestershire sauce
- 1/3 cup finely diced onions
- 1/3 cup finely diced green bell peppers
- 1 tsp garlic powder
- 1 tsp Italian seasoning
- 1 tsp kosher sea salt
- 1 tsp cumin
- 1/2 tsp cayenne pepper
- 1/2 tsp paprika
- 1 cup Italian breadcrumbs
- small amount of olive oil for brushing basket
- salt and pepper to taste
Instructions
- Break up ground beef in a large bowl.
- Add the eggs and Worcestershire sauce. Mix well.
- Mix in the diced pepper and onions.
- Add all of the spices and stir into the meat mixture.
- Add the breadcrumbs and stir thoroughly until all of the ingredients are combined well.
- Shape into golf ball sized meatballs and chill in the refrigerator in a covered dish for half an hour.
- Preheat air fryer to 350 degrees Fahrenheit. This will take about 3 minutes.
- Lightly brush olive oil on the bottom of the air fryer basket.
- Working in batches, place one layer of meatballs in the basket, with a little bit of space between each one. Lightly sprinkle salt and pepper on them. Cook for 5 minutes.
- Flip the meatballs over and lightly salt and pepper the other side. Cook 4-5 more minutes, until the meatballs are browned, and the internal temperature of the meatball is 160 degrees Fahrenheit.
Notes
Meatballs can be served with sauce in a hoagie roll or you could make the meatballs smaller and served on a tray with toothpicks and a dipping sauce. Sheri Marinari sauce would be excellent with this.

Air Fryer Pizza Logs
This is a very easy recipe. I used jarred pizza sauce and pre-packaged eggroll wrappers. I usually like to make my own sauce and eggroll wrappers from scratch, but I wanted to keep this recipe fast and simple. Because sometimes the party shows up when you least expect it.I will add the longer "from scratch" version in the future.
Equipment
- Air Fryer
- pastry brush
Ingredients
- l pkg eggroll wrappers
- 1 pkg pre-sliced pepperoni
- 1 pkg whole milk mozzarella cheese sticks
- 1/4 cup extra virgin olive oil
- 1/4 cup Everything Bagel Seasoning
Instructions
- Pre-heat air fryer to 350 degrees Fahrenheit.Set up your rolling station by laying out your ingredients in the following order:Eggroll wrappers, bowl of water, pepperoni slices, mozzarella cheese sticks, olive oil, Everything Bagel Seasoning.1. Lay out an eggroll wrapper in diamond position.2. Brush water around the edges of the wrapper (this will be the sealing agent)4. Place 5 pepperonis in a line in lower middle of eggroll wrapper, being sure to leave a 1/2" margin on either side.5. Place cheese stick on top of line of pepperoni.6. Take the tip of the wrapper facing you and fold bottom corner of wrapper over filling.7. Roll snugly halfway to cover the filling.8. Fold in left and right side like an envelope.9. Firmly but gently, finish rolling, keeping the roll as tight as possible with ripping it. You will get better at this with practice.10. Brush entire pizza roll lightly with olive oil and then sprinkle some Everything Bagel Seasoning on it.10. Place seam side down in pre-heated air fryer basket.Repeat with rest of eggroll wrappers. You may have to cook in batches depending on the size of your air fryer basket. You want to keep a space between each pizza log.Cook for 10 minutes, flipping halfway through. Eggrolls should be a light golden brown. Check every few minutes to keep them from burning. Every air fryer is different.When they have cooked to your preferred crispness, remove them from air fryer and let them cool on a cooking rack for a few minuters. Serve with a small bowl of pizza sauce.
Notes
This can also be made in the oven. Preheat oven to 450 degrees and cook a few more minutes on each size.

Won Ton Bacon, Lettuce & Tomato Bowls
Won Ton wrappers air fried in a muffin tin to shape them into bowls. Filled with Bacon, lettuce and tomato slices. Very Yummy.
Equipment
- Ninja Foodi Air Fryer If your air fryer isn't large enough to fit in air fryer, you can cook these in the oven. See note at end of recipe.
- mini muffin pan
- pastry brush
Ingredients
- 1 pckg wonton wrappers
- 10 strips cooked bacon
- 1 cup shredded romaine lettuce
- 5 cherry tomatoes, sliced thin
- 1/4 cup extra virgin olive oil
- 1 TB garlic salt
- salt and pepper to taste
- 1/4 cup mayonnaise
Instructions
- Setting up prep station: won ton wrappers, olive oil, garlic salt, shredded lettuce, sliced tomatoes, cooked bacon
- 1. Place mini muffin tin inside air fryer roasting pan. Preheat air fryer to 350 degrees Fahrenheit2. When air fryer reaches desired heat, lightly brush oil inside of muffin tin.3. drop one won ton wrapper into each muffin hole, using spoon to shape it into a bowl.4. brush inside of won ton bowl with olive oil. Sprinkle lightly with garlic salt.5. Cook for approximately 2 minutes, until won ton bowl are a light golden brown. 6. Take won ton bowls gently out of the muffin tin and let cool on baking rake.7. Spread inside of bowl with mayo and then fill each bowl in this order: shredded lettuce, a few tomato slices, a bacon slice, cut into strips.
Notes
If cooking in oven, put muffin tin in oven and preheat to 450. Cook won tons a little bit longer, till desired light golden crispness, and then follow the rest of the steps in the recipe.

Double Roll Crispy Taco Eggrolls
This is a double roll taco eggroll. You roll it twice, using 2 eggrolls wrappers for every appetizer. This gives it an extra crisp texture and ensures that the cheese doesn't leak out as you cook the eggrolls. Really great taste.
Equipment
- Air Fryer
Ingredients
- 20 TBS taco meat see my taco meat recipe
- 1 pkg shredded taco cheese (mix of cheddar, Monterey Jack and whatever other cheeses you like)
- 20 eggroll wrappers
- small bowl of water
- Garlic olive oil baste see my garlic olive oil baste recipe
Instructions
- Set up rolling station in the following order: small bowl of water, eggroll wrappers, cheese mix, taco meat, more cheese mix, Garlic olive oil baste.
- Layout eggroll wrapper in diamond shape.
- Add line of cheese in lower part of wrapper.
- Layer 2 TB of taco meat atop cheese.
- Layer 1 TB of cheese mix over taco meat.
- Roll eggroll according to directions on package
- Take another wrapper and place wrapped taco log inside and roll again.
- Brush with garlic olive oil baste
- Preheat air fryer to 350 degrees F.
- Place eggroll wrappers in basket, being careful to keep a little bit of space between each eggroll.
- Let bake 5 minutes.
- Flip over and cook 3 more minutes. At this point, the eggrolls should be a golden-brown color and crispy to the touch.
- Remove and serve with a small bowl of salsa and a small bowl of sour cream
- Enjoy.

Crispy Air Fryer French Fries
This is a 3 step recipe for crispy french fries, cooked in an air fryer. It is broken up into shree, to achieve the proper crispy texture you want in your fries.
Equipment
- Air Fryer
- sauce pan
Ingredients
- 4 medium russet potatoes
- salt to taste
- 1 TB olive oil extra virgin
- 1/4 cup ketchup
- 1/4 cup malt vinegar
Instructions
- Day One:1. Peel potatoes and cut horizontally into 1/4 " strips. Place in bowl of water as you cut, to keep potatoes from discoloring.2. When you are done cutting all of the potatoes, place them in a saucepan of salted boiling water. Water level should be about 1/3 way up the pan.3. Turn heat down to simmer. Cook 4 minutes.5. Drain and plunge the potatoes into a large bowl of salted ice water. This will stop the potatoes from cooking any longer. Let the potatoes sit in the bowl of cold water for an hour. 6. Rinse and drain the potatoes and place them on a paper towel lined sheet pan. Cover them with another layer of paper towels.7. Preheat air fryer to 375 degrees Fahrenheit.8. When air fryer is done preheating (about 3 minutes) pat potatoes dry. The drier they are, the crispier they will turn out.9. Brush a light layer of olive oil in bottom of air fryer basket.10. Place the fries in a single layer. Pour a tablespoon of olive oil over the fries and shake or stir the fries to spread the oil over the fries. You may have to cook in batches, depending on the size of your basket. Do not overcrowd the fries in the basket.11. Cook the fries for about 12 minutes, flipping or shaking the fries and salting them occasionally for even cooking. 12. When the fries have reached a golden brown color they are done.13. Serve immediately or let them cool off. Then place them in a freezer bag and store in the freezer until you need them.To reheat frozen fried:1. Preheat air fryer to 375 degrees Fahrenheit.2. When air fryer is done preheating, take fries out of the freezer and place them in a single layer in air fryer basket. Lightly brush the fries with olive oil. Stir them around, so that all of the fries have a light covering of oil on them.3. Cook them for 8 - 10 minutes, flipping and salting occasionally. Keep an eye on them. When they reach a light golden color, they are done.4. Serve with small dipping bowls of malt vinegar and ketchup (in separate bowls)